Welcome to the comprehensive guide on using Odies Oil, a natural, hard wax oil finish perfect for woodworking and other surfaces. This guide covers preparation, application, drying times, and safety tips to help you achieve professional results.
1.1 Overview of Odies Oil and Its Uses
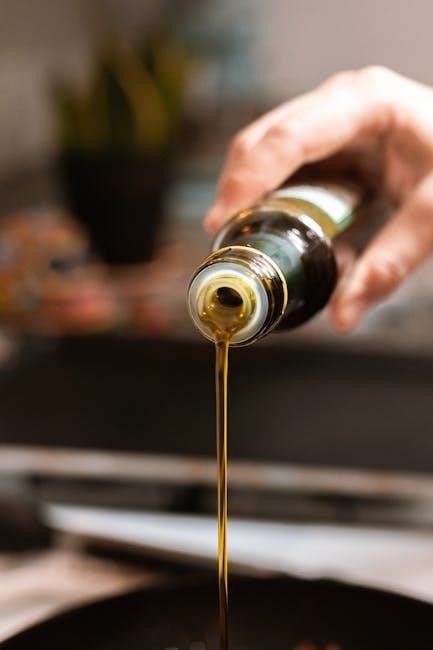
Odies Oil is a high-quality, eco-friendly hard wax oil made from 100% natural ingredients, ideal for woodworking, concrete, and other surfaces. It enhances wood grain and color while offering durability. Versatile and easy to apply, it can be brushed, wiped, or rolled, making it perfect for various projects, from furniture to flooring.
Adhering to Odies Oil instructions ensures a flawless finish and long-lasting protection. Proper preparation, application, and drying times are crucial for optimal results. Skipping steps or ignoring guidelines can lead to uneven finishes or poor durability. By following the instructions, you achieve a professional-quality finish that enhances and protects your surfaces effectively. This ensures your project stands the test of time. Proper preparation ensures optimal results. Sand surfaces to the recommended grit, clean thoroughly, and gather necessary tools like non-woven pads or cotton cloths for application. Sanding is crucial for a smooth finish. Wood surfaces should be sanded to at least 220 grit, while higher grits like 1200 can enhance shine. For wood flooring, ensure even sanding to prevent uneven absorption. Concrete and other surfaces may require specific grit sequences to ensure proper oil penetration and adhesion. Always sand with the wood grain for best results. Thoroughly clean the surface before applying Odies Oil to ensure proper adhesion and an even finish. Remove dust, dirt, and grease using a tack cloth or damp rag. Avoid harsh chemicals, as they may leave residues. Let the surface dry completely before proceeding. A clean, contaminant-free surface is essential for optimal results with Odies Oil. The essential tools for applying Odies Oil include a non-woven pad, a clean cotton terry cloth towel, or a brush. For a more textured finish, steel wool or abrasive pads can be used. Always ensure the tools are free from dust and contaminants. These tools will help achieve a smooth, even application of Odies Oil. Odies Oil can be applied by brushing, wiping, rolling, or spraying. Each method ensures the oil is worked into the surface for proper absorption and a smooth finish. Brushing is an effective method for applying Odies Oil, ensuring even coverage. Use a high-quality brush to work the oil into the surface, following the wood grain. Apply thin, uniform coats, allowing each layer to absorb fully before adding more. Light pressure is sufficient to achieve a smooth, professional finish. This method is ideal for intricate designs or small, detailed areas. Wiping is a quick and efficient way to apply Odies Oil, especially for large surfaces. Use a clean, lint-free cloth or non-woven pad, dipping it lightly into the oil. Wipe in smooth, even strokes, following the wood grain. This method ensures minimal waste and a uniform finish. It’s perfect for achieving a subtle sheen while maintaining the natural texture of the material. Rolling or spraying Odies Oil is ideal for covering large or complex surfaces efficiently. Use a foam roller or spray bottle to apply thin, even coats. Work the oil into the surface using a clean cloth or pad. This method ensures quick coverage while maintaining control over the finish. It’s particularly effective for achieving a smooth, professional look on furniture and flooring. Explore the variety of Odies Oil products, each designed for specific surfaces and finishes. Universal Oil suits most wood types, while Super Duper and Dark Oil offer enhanced color and durability. Follow tailored instructions for each to achieve the desired look and protection. Odies Universal Oil is a versatile, natural finish suitable for most wood types, wood flooring, and even concrete. For best results, sand surfaces to 1200 grit for maximum shine. Apply thin coats using a clean cotton towel or non-woven pad, ensuring even coverage. Allow 24 hours between coats, then buff for a polished look. No solvents or additives are used, making it a safe, eco-friendly option for all projects. For Super Duper Oil and Super Duper Dark Oil, apply using a brush, clean cotton towel, roller, or sprayer. Work the oil into the surface thoroughly. These oils are ideal for projects requiring enhanced durability and a rich finish. Allow 24 hours between coats and buff lightly after the final coat for an even, polished appearance. Perfect for wood, concrete, and epoxy-resin projects. Allow 24 hours between coats for optimal drying. Full curing takes 7-10 days, depending on temperature and humidity. Ensure surfaces are clean and well-prepared for even curing. Allow a minimum of 24 hours between coats for proper drying. Ideal conditions include a well-ventilated area with temperatures between 60°F-75°F (15°C-24°C) and low humidity. Ensure the surface is clean and free of dust before applying the next coat. Factors like air circulation and surface preparation can significantly impact drying efficiency; Always wait until the previous coat is fully dry to the touch. Temperature, humidity, and ventilation significantly influence curing time. Ideal curing occurs at 60°F-75°F (15°C-24°C) with low humidity. High humidity or cooler temperatures slow the process, while proper ventilation accelerates it. Surface preparation, such as sanding quality, also impacts absorption and curing efficiency. Ensure surfaces are clean and dry for optimal results. Environmental conditions must be controlled for consistent curing performance. Apply thin, even coats and allow proper drying time between layers. Lightly sand surfaces before each coat for better adhesion. Buff finished surfaces to enhance sheen and smoothness. Always use clean, lint-free cloths to avoid streaks and ensure a professional-quality finish. Apply thin, even coats of Odies Oil to ensure proper absorption and drying. Start with a light layer, allowing it to fully dry before sanding lightly and applying the next coat. This method prevents excess oil buildup and promotes a smooth, even finish. Avoid over-application, as it can lead to a sticky surface. For best results, use a non-woven pad or clean cotton cloth to wipe away any excess oil after each application. Regular sanding between coats ensures better adhesion and a professional-quality finish. Always buff the surface after the final coat to enhance sheen and durability. Buffing the surface after applying Odies Oil enhances the finish and durability. Use a clean, lint-free cloth or buffing pad to gently polish the wood in circular motions. This step removes any excess oil and creates a uniform sheen. Buffing also improves resistance to wear and tear, ensuring a long-lasting finish. For optimal results, buff after the final coat has fully dried. Regularly clean surfaces with a damp cloth to maintain the finish. For touch-ups, apply a small amount of Odies Oil to damaged areas and buff lightly. Regularly clean surfaces with a damp cloth to remove dirt and spills. Avoid harsh chemicals, as they can damage the finish. For minor scratches, apply a small amount of Odies Oil and buff with a clean cloth. This maintains the protective layer and keeps the surface looking fresh and vibrant over time. For damaged areas, lightly sand the spot to smooth the surface. Apply a small amount of Odies Oil, spreading it evenly with a clean cloth. Gently buff the area to blend with the surrounding finish. Allow the oil to cure fully before using or exposing the surface to moisture. Avoid over-application to prevent unevenness. Always wear gloves and work in a well-ventilated area. Avoid contact with heat sources or open flames. Keep Odies Oil out of reach of children. When handling Odies Oil, wear protective gloves and eyewear. Work in a well-ventilated area to avoid inhaling fumes. Keep the product away from heat sources and open flames. Store Odies Oil in a cool, dry place, out of reach of children. Dispose of rags and materials properly to prevent fire hazards. Properly dispose of rags and materials used with Odies Oil to prevent fire hazards. Do not leave oil-soaked rags in heaps or unsealed containers. Seal them in airtight containers or ziplock bags and dispose of them according to local regulations for hazardous waste. Keep the workspace clean and well-ventilated to ensure safety. Odies Oil is eco-friendly, made from 100% natural ingredients without additives or solvents, promoting sustainability and responsible use in woodworking and surface finishing. Odies Oil is crafted from 100% natural ingredients, free from harmful additives, solvents, and thinners. Its eco-friendly formula ensures minimal environmental impact, making it a sustainable choice for wood finishes. The absence of synthetic chemicals promotes safer application and disposal, aligning with environmentally responsible practices in woodworking and surface protection. Adopt sustainable practices by using Odies Oil sparingly to minimize waste. Opt for eco-friendly tools like non-woven pads or cotton cloths, which can be reused or disposed of responsibly. Ensure proper disposal of rags and materials to prevent environmental contamination. These practices align with Odies Oil’s commitment to being an eco-conscious choice for woodworking and surface protection projects. Address common issues like uneven finishes or excess oil by lightly sanding and reapplying thin coats. Buff surfaces to remove streaks for a smooth, professional result. An uneven finish or sheen often results from inadequate surface preparation or uneven application. To fix this, lightly sand the area with a high-grit sandpaper and reapply a thin, even coat of Odies Oil. Allow it to dry completely before buffing with a clean cloth to restore an even, professional appearance. Excess oil or streaks can be addressed by gently wiping the surface with a clean, lint-free cloth. For stubborn streaks, lightly sand the area with a fine-grit sandpaper and reapply a thin coat of Odies Oil. Buff thoroughly to ensure an even finish and avoid over-saturation, which can lead to a tacky surface. Explore official Odies Oil guides and tutorials for in-depth techniques. Check out recommended books like “The Art of Woodworking Finishes” for advanced tips and creative inspiration. The official Odies Oil website offers comprehensive guides, tutorials, and detailed instructions for mastering their products. Explore step-by-step videos, downloadable PDFs, and project ideas to enhance your woodworking skills. Whether you’re a beginner or a professional, these resources provide expert advice for achieving flawless finishes with Odies Oil. For in-depth learning, explore books like Finishing Tips and Techniques for Odies Products! by Odysseus Cornwall, offering expert advice on using Odies Oil. Tutorials on woodworking websites and YouTube channels provide practical demonstrations. These resources complement the official guides, ensuring you master various techniques and achieve stunning results with Odies Oil products. Thank you for choosing Odies Oil! This natural hard wax oil offers easy application and stunning results. Experiment with techniques and enjoy creating beautiful, durable finishes with confidence. For a flawless finish, apply thin, even coats and allow proper drying time between layers. Always sand surfaces to the recommended grit for optimal adhesion. Experiment with techniques like brushing or wiping to enhance texture and sheen. Regular maintenance ensures longevity, and touch-ups can easily restore damaged areas. With practice, you’ll achieve professional-quality results and unlock the full potential of Odies Oil. Embrace creativity and explore the versatility of Odies Oil to bring your projects to life. Don’t hesitate to experiment with different application techniques or layering effects to achieve unique finishes. Remember, every project is an opportunity to innovate and express your personal style. With Odies Oil, you have the tools to create something truly extraordinary and professional-quality.1.2 Importance of Following Instructions for Best Results

Preparation for Applying Odies Oil
2.1 Sanding Requirements for Different Surfaces
2.2 Cleaning the Surface Before Application
2.3 Tools Needed for Application
Application Methods for Odies Oil
3.1 Brushing Odies Oil
3.2 Wiping Odies Oil
3.3 Rolling or Spraying Odies Oil
Types of Odies Oil and Their Specific Instructions
4.1 Universal Oil Instructions
4.2 Super Duper Oil and Super Duper Dark Oil Instructions
Drying and Curing Time
5.1 Recommended Drying Time Between Coats
5.2 Factors Affecting Curing Time
Tips for Achieving the Best Finish
6.1 Layering Thin Coats for Optimal Results
6.2 Buffing the Surface After Application
Maintenance and Touch-Up
7.1 Regular Maintenance Tips
7.2 Touch-Up Techniques for Damaged Areas

Safety Precautions
8.1 Handling Odies Oil Safely
8.2 Disposal of Rags and Materials

Environmental Considerations
9.1 Eco-Friendly Properties of Odies Oil
9.2 Sustainable Practices When Using Odies Oil
Troubleshooting Common Issues
10.1 Addressing Uneven Finish or Sheen
10.2 Fixing Excess Oil or Streaks
Resources for Further Learning
11.1 Official Odies Oil Website and Guides
11.2 Recommended Books or Tutorials
12.1 Final Tips for Mastering Odies Oil Application
12.2 Encouragement to Experiment and Create