Mondella shower screens offer elegant, functional designs for modern bathrooms, combining sleek glass panels with durable frames. Proper installation ensures safety, longevity, and optimal performance.
Overview of Mondella Shower Screens
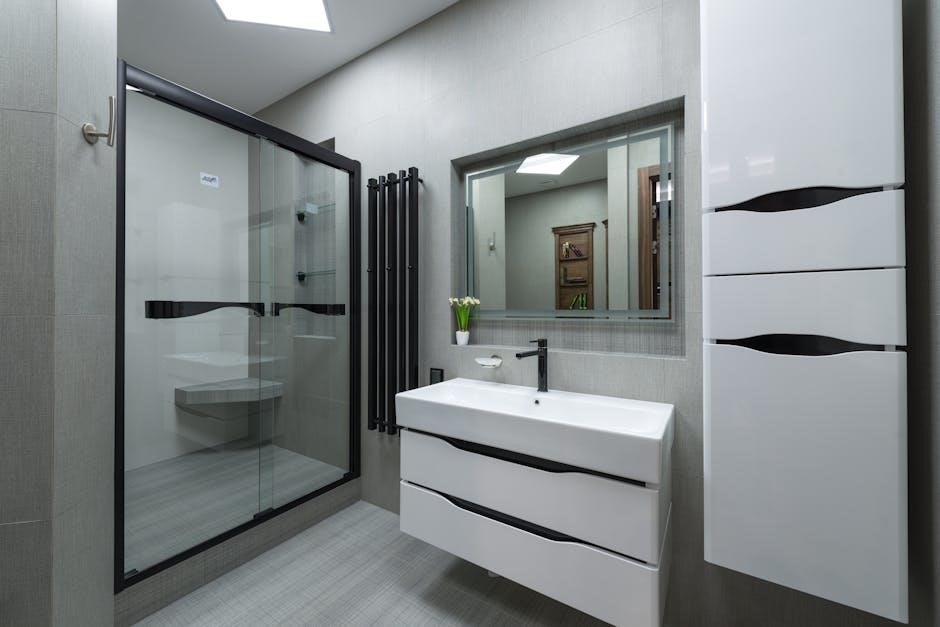
Mondella shower screens are renowned for their stylish designs, durability, and ease of installation. They offer a wide range of models, from frameless to semi-frameless options, catering to various bathroom styles. Made with high-quality glass and sturdy frames, Mondella screens are both functional and aesthetically pleasing. Their designs prioritize water containment and ease of cleaning, making them a practical choice for modern bathrooms. With a focus on affordability and trend-aligned styles, Mondella shower screens are a popular choice for homeowners and renovators alike.
Importance of Proper Installation
Proper installation of Mondella shower screens is crucial for ensuring water tightness, preventing leaks, and maintaining structural integrity. Incorrect installation can lead to water damage, mold growth, and safety hazards. A well-installed screen enhances bathroom aesthetics and functionality, providing a durable and long-lasting solution. Adhering to manufacturer guidelines ensures optimal performance and warranty validity, making proper installation a vital step in achieving a safe and stylish bathroom environment.
Preparation for Installation
Ensure the bathroom area is clear, tools are ready, and surfaces are clean. Verify all components are included and aligned properly before starting the installation process.
Tools and Materials Required
Essential tools include a drill, spirit level, measuring tape, and screwdriver. Materials needed are rubber spacers, silicone sealant, wall brackets, and screws. Ensure all items are readily available to streamline the installation process and avoid delays. Proper preparation of these tools and materials is crucial for a secure and professional-looking setup. Always refer to the Mondella installation manual for specific component requirements to ensure compatibility and safety during the process.
Reading the Installation Manual
Before starting, thoroughly read the Mondella installation manual to understand the process. It provides step-by-step instructions, safety precautions, and specific product details. Pay attention to diagrams and component listings to ensure accuracy. The manual may include product codes like INS A129 V1 or INS 032 V2, which are essential for correct installation. Following the guide carefully prevents errors and ensures a secure, professional finish. Always verify compatibility and safety guidelines before proceeding with any steps.
Understanding the Components
Understanding the components of Mondella shower screens is crucial for installation. They include fixed glass panels, doors, hinges, and frames, each essential for proper assembly and functionality.
Fixed Glass Panel and Door Assembly
The fixed glass panel forms the primary structure of the shower screen, providing stability and support. It must be mounted securely to the wall, ensuring it does not touch the floor. The door assembly includes hinges and handles, designed for smooth operation. Proper alignment of the door with the fixed panel is essential for a watertight seal. The hinges allow for easy opening and closing, while the handles provide a comfortable grip. Correct installation ensures durability and functionality, maintaining the shower screen’s aesthetic appeal and performance over time.
Frame and Hinges
The frame provides structural support and stability to the shower screen, ensuring durability and alignment. Hinges are critical for smooth door operation, securely attaching the door to the fixed glass panel. Proper hinge installation ensures the door opens and closes effortlessly, while also maintaining proper alignment. The frame is typically made of sturdy materials, such as aluminum or stainless steel, to withstand moisture and heavy use. Correctly fitted hinges prevent wear and tear, ensuring long-lasting functionality and maintaining the screen’s aesthetic appeal.
Measuring the Bathroom Area
Accurate measurements ensure a proper fit for your Mondella Shower Screen. Use a tape measure to determine the width, height, and layout of your bathroom area. Ensure the screen aligns with existing fixtures and wall placements for seamless installation and optimal functionality.
Ensuring Correct Dimensions
Measure the bathroom area to confirm the shower screen fits perfectly. Ensure the dimensions match the screen’s specifications. Double-check the width, height, and any obstructions. Proper alignment with walls and fixtures is crucial for a seamless installation. Verify measurements against the Mondella installation manual to avoid errors. Accurate sizing ensures stability, prevents leaks, and maintains the screen’s functionality. Always cross-reference your measurements with the manufacturer’s guidelines for optimal results.
Checking for Level and Plumb
Use a spirit level to ensure the bathroom floor and walls are level and plumb. This step is critical for proper alignment of the shower screen. Any unevenness can lead to poor fitting or water leakage. Mark the wall surfaces with a carpenter’s pencil to guide installation. Double-checking ensures the screen stands upright and functions correctly. Misalignment can compromise structural integrity and aesthetics, so precision is key during this process.

Installing the Fixed Glass Panel
Begin by installing the fixed glass panel using rubber spacers to avoid floor contact. Ensure it’s secure and level for proper alignment and stability.
Mounting the Panel to the Wall
Position the fixed glass panel against the wall, ensuring it is level and plumb. Use rubber spacers to prevent direct contact with the floor. Mark the wall where the panel’s brackets will attach. Drill pilot holes and screw the brackets into place. Carefully lift the panel and secure it to the brackets. Tighten all screws firmly, ensuring the panel is stable and evenly aligned. Double-check the level to ensure proper installation and prevent water leakage or structural issues.
Securing with Rubber Spacers
Place rubber spacers between the glass panel and the wall to prevent direct contact, ensuring proper drainage and reducing risk of water damage. These spacers also act as shock absorbers, minimizing movement and potential cracks. Align the panel with pre-installed brackets, gently lowering it into position. Ensure spacers are evenly distributed and firmly seated. Secure the panel by tightening the screws, but avoid overtightening to prevent damage to the glass or surrounding area. This step is crucial for stability and longevity of the shower screen.

Attaching the Shower Door
Align the door with the fixed panel, ensuring proper positioning. Secure the hinges to the frame and attach the handles. Tighten all fittings for stability and balance.
Aligning the Door with the Fixed Panel
Aligning the door with the fixed glass panel ensures smooth operation. Use the manufacturer’s alignment guides or spacers to position the door accurately. Check the vertical and horizontal alignment to prevent gaps. Proper alignment prevents wear and tear on hinges and ensures the door closes securely. Use a spirit level to confirm the door is plumb and evenly spaced from the fixed panel for optimal functionality and appearance.
Installing Hinges and Handles
Attach the hinges to the shower door, ensuring they align with the fixed panel’s hinge receptors. Secure the hinges using the provided screws, tightening firmly. Next, install the door handles, positioning them at a comfortable height. Ensure the handles are evenly spaced and aligned for a balanced appearance. Refer to the installation manual for specific hinge and handle placement recommendations to guarantee proper functionality and aesthetics. Double-check all fittings for tightness before finalizing the installation.

Sealing Gaps and Final Adjustments
Apply silicone sealant around the edges to prevent water leakage. Ensure all components are securely fastened and properly aligned for a watertight and stable installation.
Applying Silicone Sealant
Apply silicone sealant around the edges of the glass panels and door frames to ensure a watertight seal. Use a caulking gun to spread the sealant evenly, covering all gaps. Wipe off excess with a damp cloth for a clean finish.
Allow the sealant to cure for 24 hours before using the shower. This step ensures durability and prevents water from seeping behind the panels, maintaining the integrity of your Mondella shower screen installation.
Tightening All Fittings
After installing the shower screen, inspect all screws, hinges, and handles to ensure they are securely fastened. Use an Allen key or screwdriver to tighten any loose fittings. Properly aligned and tightened components ensure stability and prevent water leaks. Double-check the frame and door connections for a secure fit. Refer to the installation manual for specific torque settings to avoid overtightening, which could damage the glass or frame. This step guarantees a durable and leak-free Mondella shower screen installation.
Maintenance and Care
Regularly clean the shower screen with a mild detergent to prevent soap scum buildup. Dry the glass after use to avoid water spots and maintain clarity.
Cleaning the Shower Screen
Regular cleaning is essential to maintain the clarity and functionality of your Mondella shower screen. Use a mild detergent and warm water to remove soap scum and water spots. Avoid using harsh chemicals or abrasive materials, as they may damage the glass or frame. Dry the screen thoroughly after each use with a lint-free cloth or squeegee to prevent water marks. For tougher stains, mix equal parts water and white vinegar, apply with a soft cloth, and rinse thoroughly. This will keep your shower screen looking like new and ensure optimal performance.
Inspecting for Wear and Tear
Regularly inspect your Mondella shower screen for signs of wear and tear to ensure its longevity. Check the hinges, handles, and seals for any looseness or damage. Inspect the glass for cracks or chips and the frame for rust or corrosion. Look for water leakage around the edges or joints. Address any issues promptly by tightening fittings or replacing worn-out parts. If damage is extensive, consult a professional to avoid further deterioration and maintain the screen’s functionality and appearance.