
The Nurture Right 360 Incubator is a top-tier, user-friendly device designed for home hatching, offering precise temperature and humidity control for optimal egg development and high hatch rates.
1.1 Overview of the Nurture Right 360 Incubator
The Nurture Right 360 Incubator is a state-of-the-art, all-in-one hatching solution designed for both hobbyists and professionals. It combines advanced digital controls with a user-friendly interface, ensuring precise temperature and humidity management. The incubator is equipped with features like automatic egg turning and a clear viewing window, making it ideal for monitoring the hatching process. Its compact design and ease of use make it suitable for home environments, while its robust construction supports high hatch rates. The device is particularly popular for incubating poultry, exotic birds, and reptiles, offering a reliable and efficient way to nurture eggs from fertilization to hatching. Its versatility and performance have made it a favorite among breeders and enthusiasts worldwide.
1.2 Key Features of the Nurture Right 360 Incubator
The Nurture Right 360 Incubator boasts an array of innovative features that enhance the hatching experience. It includes digital temperature controls, allowing users to set and maintain precise temperatures between 99-100°F. The incubator also features automatic egg turning, which gently rotates eggs to ensure even development. A built-in humidity system with adjustable vents enables optimal moisture levels, crucial for successful hatching. The clear viewing window provides real-time monitoring of eggs without disturbing the environment. Additionally, the incubator is designed for quiet operation, minimizing disruptions; These features, combined with its durable construction and easy-to-follow manual, make the Nurture Right 360 an excellent choice for both novice and experienced breeders, ensuring high hatch rates and healthy outcomes.
1.3 Importance of the Incubator Manual

The incubator manual is an essential resource for optimal use of the Nurture Right 360. It provides detailed instructions for setup, operation, and troubleshooting, ensuring users achieve the best hatching results. The manual outlines step-by-step guidance for adjusting temperature, managing humidity, and monitoring egg development. It also includes a pre-operation checklist and maintenance tips to maintain the incubator’s performance. Additionally, the manual addresses common issues like temperature fluctuations and humidity problems, offering practical solutions. By following the manual, users can avoid costly mistakes and ensure a stable environment for their eggs. The comprehensive instructions, combined with the FAQ document and PDF manual, make it an indispensable tool for both novice and experienced breeders, guaranteeing a successful hatching experience.

Setting Up the Nurture Right 360 Incubator
Setting up the Nurture Right 360 involves unboxing, inspecting, and assembling components. Follow the manual for proper installation, ensuring all parts are correctly aligned and secured.
2.1 Unboxing and Initial Inspection
Begin by carefully unboxing the Nurture Right 360 Incubator, ensuring all components are included and undamaged. Inspect the incubator base, top, and accessories for any signs of damage or defects. Verify that the power supply, water reservoir, and egg trays are present. Before assembly, ensure the incubator is placed on a stable, level surface in a room with a consistent temperature between 74-80°F. Plug in the incubator and allow it to run dry (without water) for 24 hours to ensure proper function. This step helps verify that the unit is operating correctly before introducing eggs. Proper alignment of the clear window is crucial for monitoring without compromising the internal environment.
2.2 Assembly and Preparation
Connect the power supply unit to the incubator top, ensuring it is securely attached. Place the top onto the incubator base, making sure the clear window is completely closed and properly aligned. Verify that all components, such as the water reservoir and egg trays, are correctly positioned. Plug in the incubator and allow it to run dry (without adding water) for 24 hours. This step ensures the incubator is thoroughly dry and functioning correctly before use. During this time, monitor the temperature and humidity levels to confirm they stabilize within the recommended ranges. Once the incubator is ready, you can proceed to set up the desired conditions for hatching. Proper assembly and preparation are critical for optimal performance and successful hatching outcomes.
2.3 Pre-Operation Checklist
Before operating the Nurture Right 360 Incubator, ensure all components are properly assembled and the incubator is placed in a stable, level surface. Verify that the clear window is completely closed and aligned correctly. Check that the power supply is securely connected and the incubator is plugged into a reliable power source. Ensure the incubation room temperature is between 74-80°F for optimal performance. Allow the incubator to run dry (without water) for 24 hours to confirm proper function and stabilization of temperature and humidity levels. Once these steps are completed, the incubator is ready for setting up the desired conditions for hatching. This pre-operation checklist ensures everything is in order for a successful hatching process.

Operating the Nurture Right 360 Incubator
Press and hold the MENU button for 3 seconds to adjust temperature settings, managing humidity levels, and ensuring proper egg placement for optimal hatching conditions.
3.1 Adjusting Temperature Settings
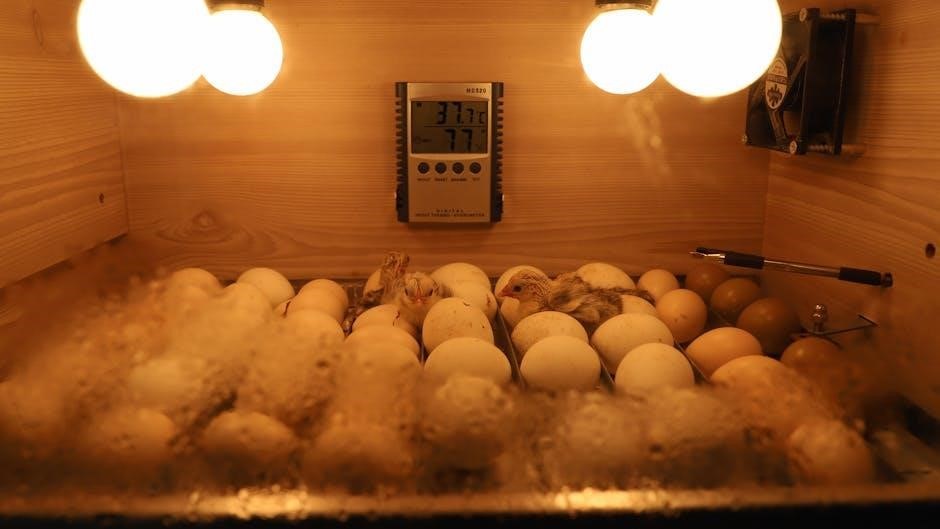
To adjust the temperature on the Nurture Right 360 Incubator, press and hold the MENU button for 3 seconds. The preset temperature (99.5°F) will begin to blink. Use the + or ⏤ buttons to increase or decrease the temperature as needed. Once adjusted, press the MENU button again to save the new setting. The incubator will maintain the selected temperature with high precision, ensuring optimal conditions for egg development. Always allow the incubator to stabilize for a few minutes after making adjustments. For best results, place the incubator in a room with a stable ambient temperature between 74°F and 80°F to minimize fluctuations.
3.2 Managing Humidity Levels
Proper humidity management is crucial for successful hatching. After assembling the incubator, run it dry for 24 hours to ensure it is thoroughly dry. Once operational, add water to the reservoir as needed to maintain the recommended humidity levels. Check the water level daily and refill if necessary to prevent it from running low. Humidity levels are particularly critical during the final days of incubation, around days 18-21, when the eggs prepare to hatch. Avoid over-saturating the incubator, as excessive moisture can hinder hatching. Ensure the incubator is placed in a room with stable temperature and humidity conditions to support optimal egg development and hatch rates.
3.3 Placing Eggs in the Incubator
Once the incubator is properly set up and running, gently place the eggs inside, ensuring they are clean and dry. Position them with the pointed end down to maintain balance and proper air circulation. Avoid overcrowding the incubator, as this can disrupt airflow and temperature distribution. Close the clear window securely after placing the eggs to maintain consistent conditions. Allow the incubator to stabilize for a few minutes before adding more eggs. Always check for cracks or damage before placing eggs inside, as this can affect hatch rates. Proper egg placement is essential for even heating and humidity distribution, ensuring optimal development and hatching success.
Monitoring and Maintaining the Incubator
Regular monitoring ensures optimal conditions. Check temperature, humidity, and airflow daily. Maintain stable room conditions and ensure the power supply is reliable for consistent operation.
4.1 Daily Monitoring of Temperature and Humidity
Daily monitoring of temperature and humidity is crucial for optimal incubation. Use the digital display to ensure temperature remains at 99.5°F and humidity levels are stable. Check the incubator’s environment, as room temperatures between 74-80°F promote consistent performance. Verify that the grey air vent is fully open for proper airflow. Regularly inspect water levels in the humidity channels and refill as needed to maintain desired conditions. Refer to the manual for troubleshooting tips if readings fluctuate. Consistent monitoring ensures a stable environment, promoting healthy egg development and high hatch rates. Always follow the manufacturer’s guidelines for adjustments and maintenance.

4.2 Ensuring Proper Air Circulation
Proper air circulation is essential for maintaining a healthy environment within the incubator. Ensure the grey air vent is fully open to allow adequate airflow, as this helps regulate temperature and humidity. Place the incubator in a room with stable temperatures between 74-80°F to prevent external fluctuations from affecting internal conditions. Avoid blocking the incubator’s vents or surrounding areas, as this can disrupt air flow. Regularly inspect the vent and ensure it is free from obstructions. Proper air circulation promotes even heat distribution and prevents the buildup of excess moisture, which is critical for successful hatching. Always follow the manual’s guidelines for ventilation to maintain optimal conditions for egg development.
4.3 Cleaning and Sanitizing the Incubator
Cleaning and sanitizing the Nurture Right 360 Incubator is crucial for maintaining a hygienic environment and ensuring successful hatching. Before first use, run the incubator dry for 24 hours to ensure it is thoroughly dry. Regularly wipe down surfaces with a soft cloth and mild detergent, avoiding harsh chemicals that could damage components. After each hatch cycle, remove and sanitize all trays and accessories using a solution of water and vinegar. Rinse thoroughly and allow everything to dry before reuse. Proper cleaning prevents bacterial growth and ensures optimal conditions for egg development. Always follow the manual’s cleaning guidelines to maintain the incubator’s performance and longevity.

Hatching Process and Expectations
The Nurture Right 360 Incubator facilitates a seamless hatching process, with eggs developing from day one to hatching in about 21 days, depending on species.
5.1 Understanding the Hatching Timeline

The hatching process with the Nurture Right 360 Incubator typically spans 21 days, varying slightly by species. Days 1-14 focus on embryonic development, with visible growth through candling. By day 15-18, eggs enter the transition phase, preparing for hatching. Days 19-21 mark the final stages, where the embryo positions itself and breaks free. The incubator maintains optimal conditions, ensuring a smooth journey from fertilization to emergence. Monitoring these stages helps users anticipate and prepare for the exciting hatching phase, supported by the incubator’s precise temperature and humidity control.
5.2 Observing Egg Development
Monitoring egg development in the Nurture Right 360 Incubator is crucial for ensuring a successful hatch. The incubator’s clear viewing window allows users to observe progress without disturbing the eggs. Candling, typically done weekly, involves shining a light through the egg to check for visible growth, such as blood vessels and embryo movement. Proper candling techniques prevent over-handling, which can harm development. The incubator’s digital controls maintain precise temperature and humidity, supporting healthy growth. Regular observation helps identify potential issues early, ensuring optimal conditions for the developing embryos. This process is essential for understanding the incubation cycle and preparing for the hatching phase.
5.3 Preparing for the Hatching Phase
As the hatching phase approaches, it’s essential to ensure the Nurture Right 360 Incubator is ready for the critical process. Stop turning the eggs 3 days before the expected hatch date to allow the embryos to position themselves correctly. Maintain stable temperature (99.5°F) and humidity levels (70-80%) to support the hatching process. Avoid opening the incubator during this time to prevent disrupting the environment. Observe the eggs through the clear viewing window to monitor progress without interference. Ensure the incubator is placed in a quiet, draft-free area to minimize stress on the hatching chicks. Be prepared to provide a safe, warm brooder for the newly hatched chicks once they emerge. Proper preparation ensures a smooth and successful hatching experience.
Troubleshooting Common Issues
Address temperature fluctuations by ensuring the incubator is in a stable environment (74-80°F). Check and adjust humidity levels, and prepare for power outages with backup solutions.
6.1 Addressing Temperature Fluctuations

Temperature stability is crucial for successful hatching. If fluctuations occur, ensure the incubator is placed in a room with a stable environment (74-80°F). Check the digital controls and adjust settings as needed. Verify that the incubator is away from direct sunlight or drafts. If issues persist, inspect the heating element and ensure proper air circulation. Power outages can also cause temperature drops, so consider using a backup power source. Regularly monitor the incubator’s temperature display and refer to the manual for calibration instructions if necessary. Maintaining consistent heat ensures optimal egg development and hatch rates.
6.2 Resolving Humidity Problems
Humidity issues can impact egg development. If the incubator’s humidity level is too low, add water to the reservoir as instructed in the manual. Ensure the water reservoir is clean and filled appropriately. If humidity is too high, reduce the water level or slightly open the air vent to improve circulation. Regularly monitor the humidity display and adjust settings as needed. Avoid over-humidification, as it can lead to poor air quality and reduced hatch rates. Proper humidity management, combined with consistent temperature, ensures a healthy environment for embryo development. Refer to the manual for specific guidelines on maintaining optimal humidity levels throughout the incubation process.
6.3 Dealing with Power Outages
In the event of a power outage, immediately check the incubator’s power source and ensure it is properly connected. If the outage persists, consider using a backup power source, such as a UPS, to maintain operation. Once power is restored, verify that temperature and humidity settings are still accurate and adjust if necessary. Allow the incubator to stabilize before adding water or making further adjustments. If the outage was prolonged, monitor egg development closely for any signs of stress. Always prioritize maintaining a stable environment to ensure the health and viability of the embryos. Refer to the manual for additional guidance on handling unexpected interruptions.
Additional Resources and Support
Access the FAQ document, PDF instruction manual, and customer support for troubleshooting, warranty details, and operational guidance to ensure optimal use of the Nurture Right 360 Incubator.
7.1 FAQ Document for the Nurture Right 360
The FAQ document for the Nurture Right 360 Incubator provides quick answers to common questions, ensuring smooth operation and troubleshooting. It covers topics like temperature settings, humidity management, and egg placement. Users can find solutions to issues such as unexpected temperature fluctuations or humidity imbalances. The FAQ also addresses pre-hatch preparation and post-hatch care. Designed to be user-friendly, it helps beginners and experienced users alike. By referring to the FAQ, you can resolve minor issues without needing to contact support, saving time and ensuring optimal incubation conditions. This resource is essential for maximizing the performance of your Nurture Right 360 Incubator and achieving successful hatches.
7.2 Accessing the PDF Instruction Manual
Accessing the PDF instruction manual for the Nurture Right 360 Incubator is straightforward. The manual is available for download from the official website or can be found on the product’s support page. It provides detailed, step-by-step guidance on assembly, operation, and maintenance. The PDF format allows users to easily navigate and reference specific sections, such as temperature settings or troubleshooting. This comprehensive guide ensures users can maximize the incubator’s features and achieve optimal hatching results. Regularly updating to the latest version of the manual is recommended to access the most current information and improvements. The manual is a vital resource for both new and experienced users, offering clarity and confidence in using the Nurture Right 360 Incubator effectively.
7.3 Customer Support and Warranty Information
The Nurture Right 360 Incubator is backed by comprehensive customer support and a robust warranty program. Users can contact the manufacturer via phone, email, or live chat for assistance with any issues. The warranty typically covers parts and labor for a specified period, ensuring peace of mind. Additionally, the support team provides troubleshooting guidance and maintenance tips to optimize incubator performance. For warranty details, users should refer to the PDF manual or visit the official website. This dedicated support system ensures that any concerns are addressed promptly, helping users achieve successful hatching outcomes. The combination of reliable customer service and a strong warranty makes the Nurture Right 360 Incubator a trusted choice for home hatching enthusiasts.
The Nurture Right 360 Incubator is a reliable tool for successful hatching, offering precise controls and comprehensive guidance. Continuous learning and experimentation enhance outcomes.

8.1 Summary of Key Points
The Nurture Right 360 Incubator is a user-friendly device designed for optimal egg incubation, offering precise temperature and humidity controls. It features digital settings, pre-set options, and a clear viewing window for monitoring. Proper setup includes unboxing, assembly, and a pre-operation checklist to ensure readiness. Daily monitoring of temperature (99.5°F) and humidity is crucial, along with maintaining stable air circulation. Cleaning and sanitizing are essential for a healthy environment. The incubator’s manual provides detailed instructions, while additional resources like FAQs and customer support are available for troubleshooting. By following guidelines and maintaining consistent conditions, users can achieve high hatch rates and successful outcomes. Regular maintenance and adherence to the manual ensure long-term performance and reliability.
8.2 Final Tips for Successful Hatching
For optimal results with the Nurture Right 360 Incubator, ensure stable temperature (99.5°F) and humidity levels throughout the incubation period. Maintain a consistent environment, avoiding sudden changes. Regularly monitor egg development and adjust settings as needed. Keep the incubator in a room with stable temperatures (74-80°F) and proper air circulation. Clean and sanitize the unit before and after use to prevent contamination. Refer to the manual for troubleshooting common issues like temperature fluctuations or humidity imbalances. Be patient and avoid opening the incubator excessively during the hatching phase. By following these guidelines and staying attentive, you can achieve high hatch rates and successfully raise healthy chicks. Always consult the FAQ or customer support for additional assistance.
8.3 Encouragement for Further Learning
Exploring the full potential of the Nurture Right 360 Incubator involves continuous learning and experimentation. Dive into the provided FAQ document and PDF manual for in-depth insights and troubleshooting tips. Engage with online forums or poultry-keeping communities to share experiences and gain knowledge from seasoned users. Observing the day-by-day development of eggs, as highlighted in user journeys, can deepen your understanding of the incubation process. Stay curious about optimal temperature, humidity, and air circulation practices. Experiment with different egg types, like exotic pheasants, to broaden your skills. Remember, practice and patience are key to mastering the art of hatching. For further guidance, reach out to customer support or explore additional resources available on the manufacturer’s website. Happy hatching!